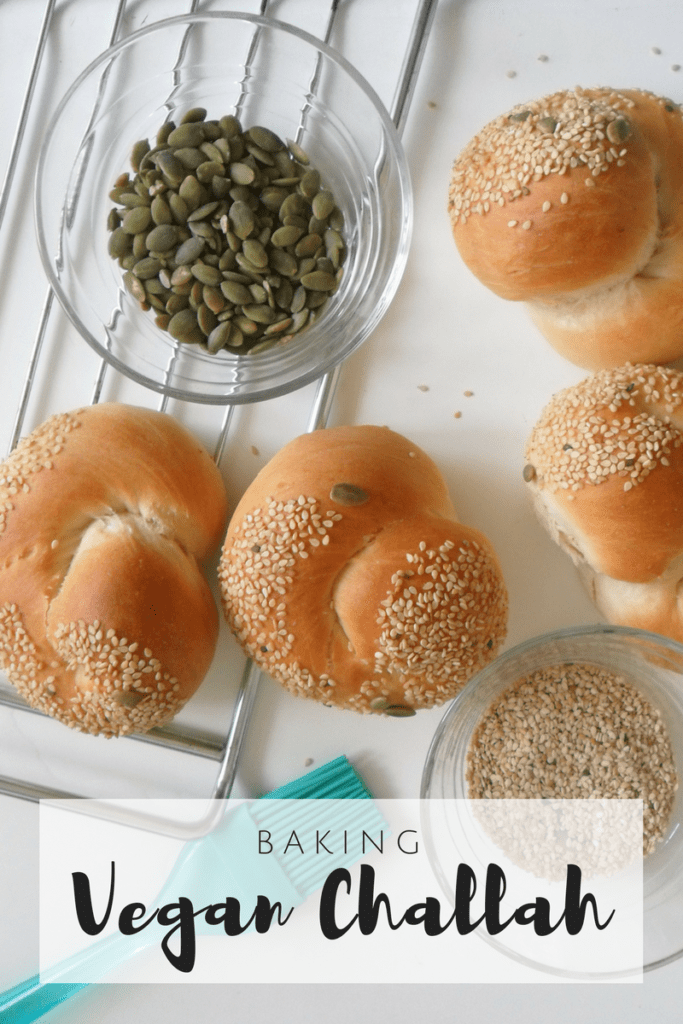
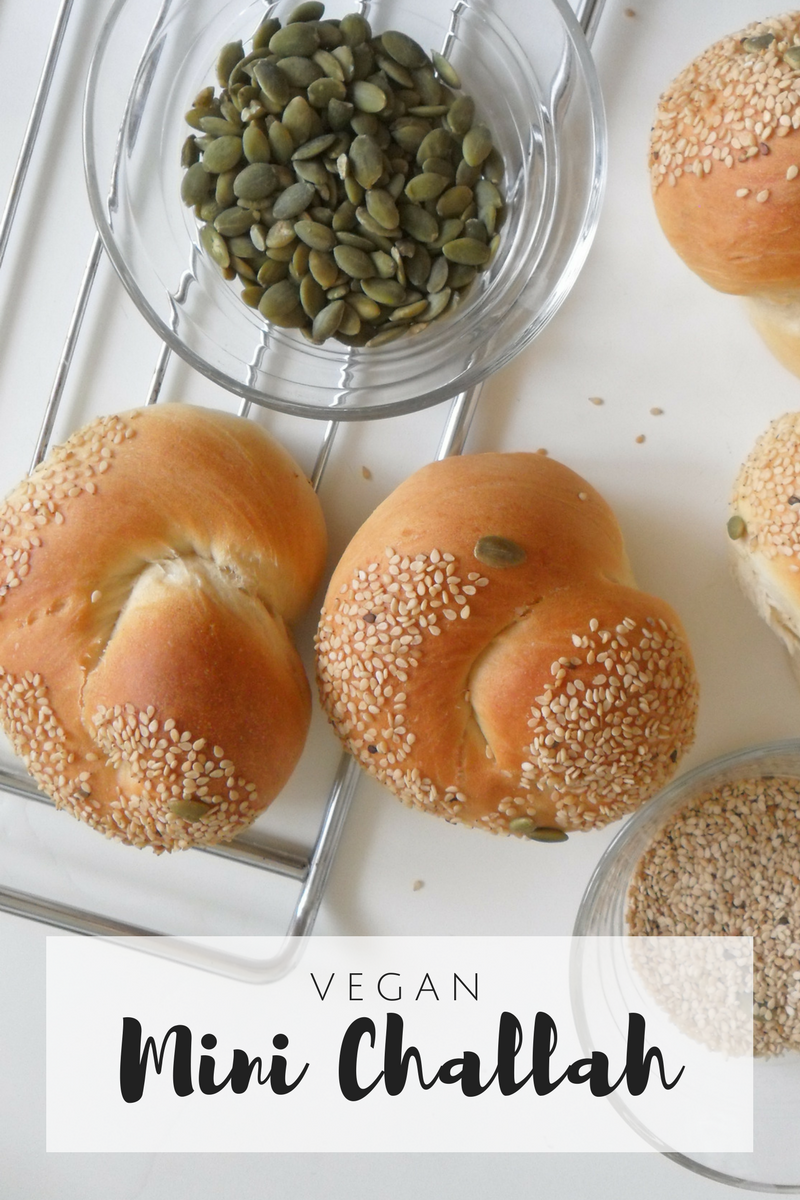
Breads & Doughs

Vegan Challah

Have you ever wanted to make Challah and then realized you are out of eggs? No need to go last minute shopping anymore thanks to this easy Vegan Challah.

Making bread at home

Bread is made with 4 basic ingredients: Flour, water, yeast and salt; so essentially “bread” has been made vegan for generations, but today a lot of recipes have tons of eggs.

If you are allergic to eggs or, you just ran out of eggs at 10 pm, right before starting baking; don’t worry, you have come to the right place.

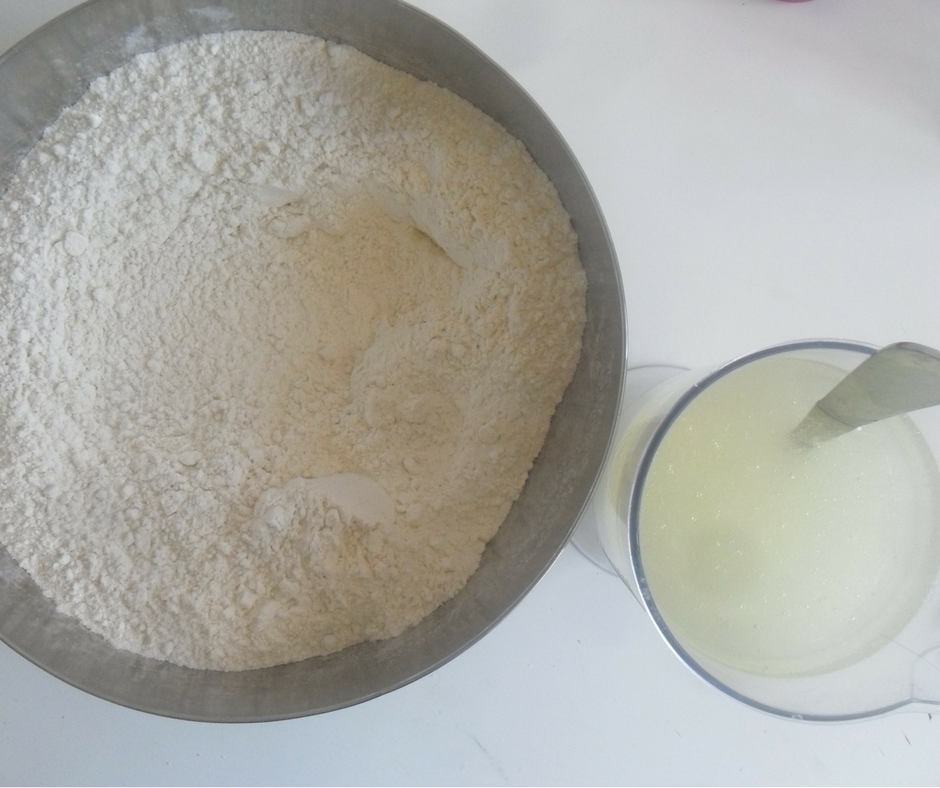
The recipe I use was originally created by Rachel Orenstein Packer. In her recipe she uses a combination of oil, water and baking powder which she mixes separately to create an egg replacement (so the original recipe calls for 2 amounts of water and 2 amounts of oil).

I wanted to make this easier for me so I mixed together my dry ingredients (flour, yeast, sugar and salt) and, in another container, all the liquids plus baking powder, and after making it both ways, I honestly don’t see a difference.

Kneading by hand or not?

I like to knead my dough by hand because this is how I learned and it is so therapeutic!! so this is how I made this Vegan Challah initially, but you can use an stand mixer if you prefer.

When using a stand mixer, adjust the kneading time and speed as it is easier to overheat or overwork the dough using one. To avoid any issues with the quality of your bread, and to avoid burning your stand mixer, knead at low speed.

What you are looking for when kneading, either by hand or stand mixer is to have a stretchy and smooth dough.

Note on the ingredients

I converted the original recipe in grams in order to achieve consistent results, so for this recipe you obviously will need a digital scale. I know it can sound a little tedious at the beginning, but honestly is the best you can do, specially when baking. (For the recipe in cups, visit here)


Make sure you buy bread flour when making a bread recipe, It has a higher protein content (gluten) and will result on a more elastic dough and better final product.

Also make sure the yeast you are using is fresh. For this recipe I use instant yeast for convenience, but if you are using fresh baker’s yeast (the one that comes in blocks), you’ll need to double or triple the amount. (to be safe I will double the yeast and increase the time for fermentation).

When adding the yeast to the dry ingredients make sure you add the salt far away from the yeast so that it doesn’t make direct contact because the salt kill the yeast.

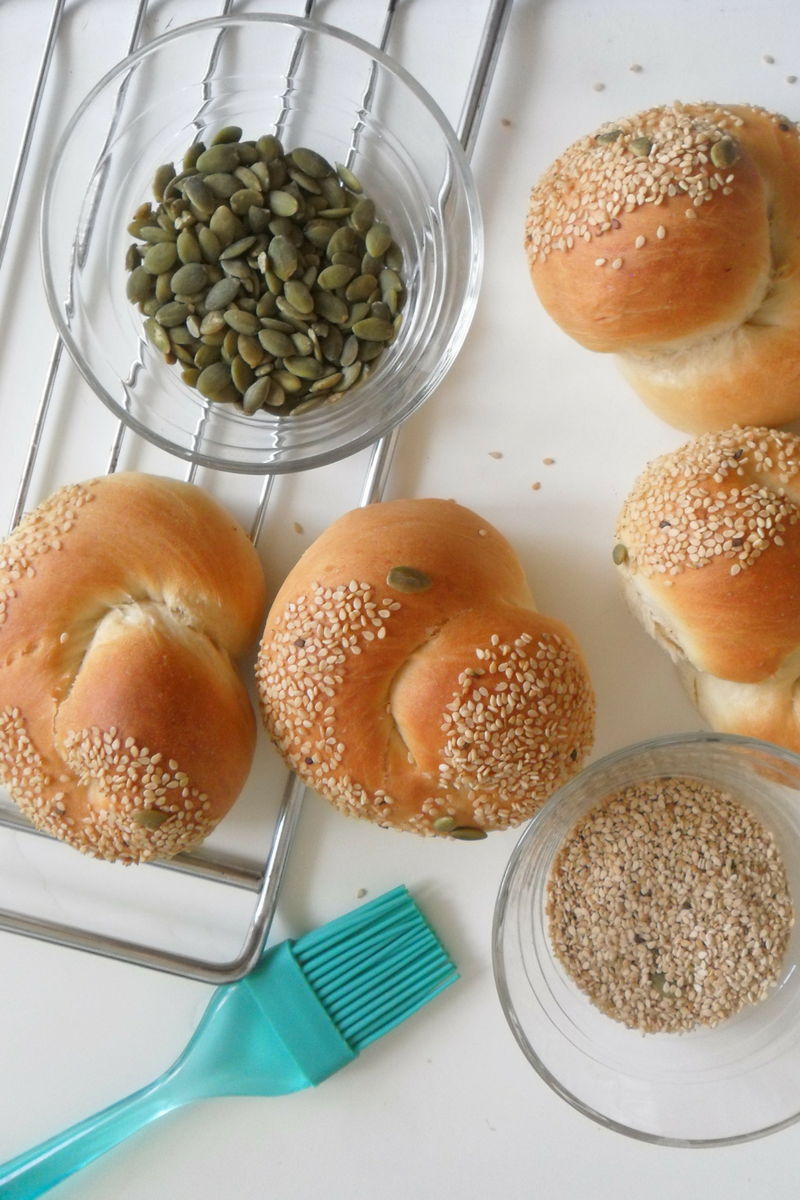
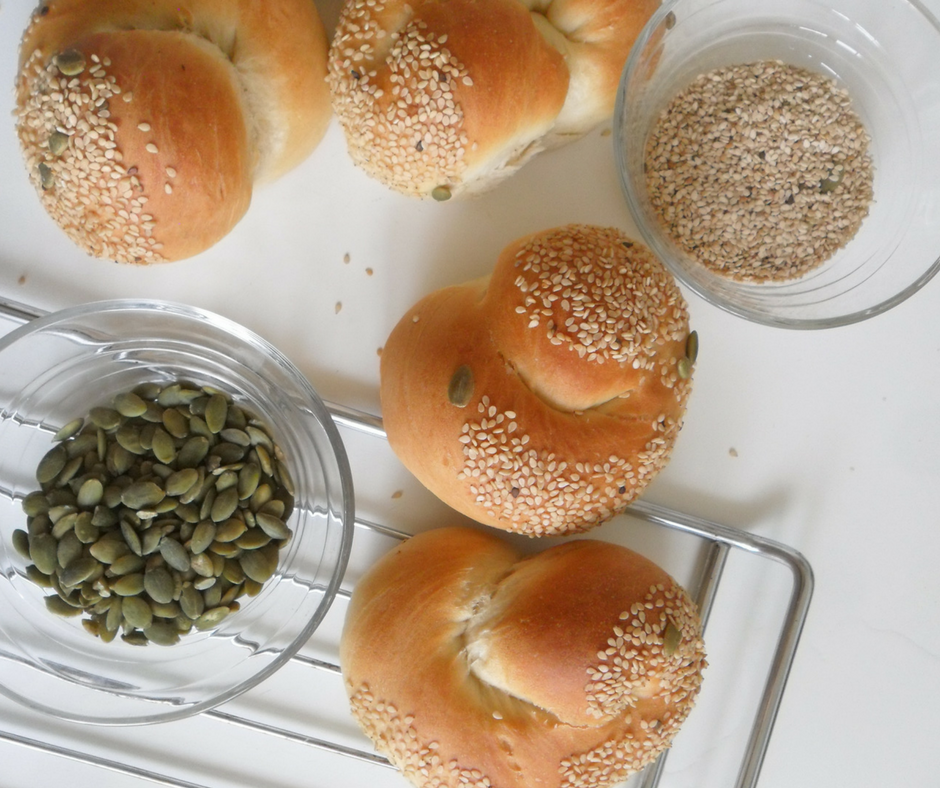
To add the seeds to the top, I just dip the top in a little bit of water and then dip in a bowl with seeds/seed mixture. You can also just brush the top with maple syrup if you like the flavor and want the shine, but this is not necessary.

A dough in the making

Once you poured wet ingredients into the dry, start mixing with a fork and then, continue to mix with your hands, still in the bowl, until the dough comes together (See picture below)

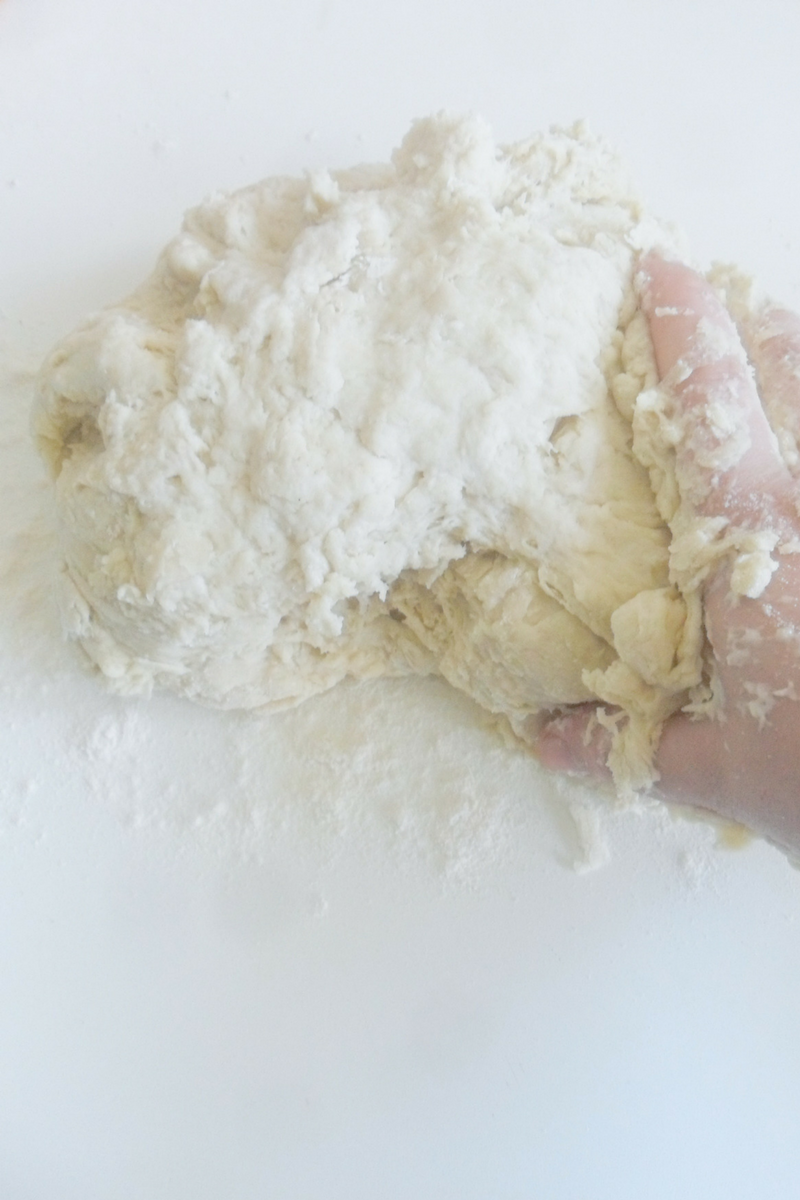
Once this point have being achieved, transfer the dough to a lightly floured surface. As you can see in the picture below, the dough looks messy and a bit crumbly, so you will knead unto the point where you see the dough is smooth and elastic. This will take about 10 minutes.

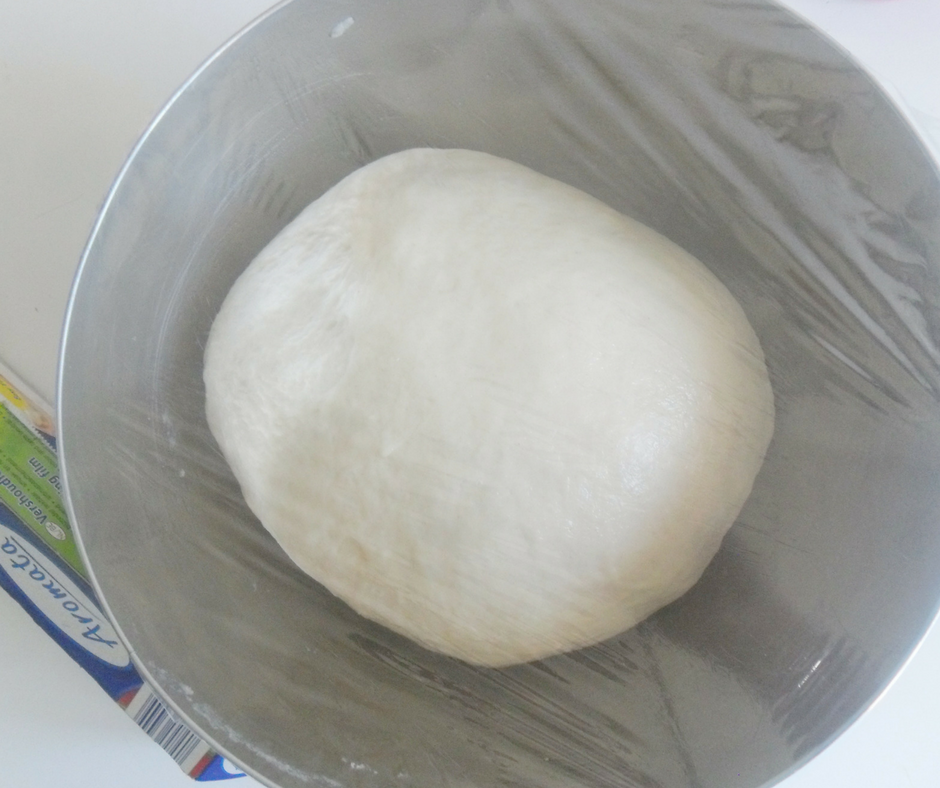
When transferring to your work surface, don’t go crazy about the flour or you will dry out the dough. I find 2 Tbsp is enough. Knead the dough for 10 minutes straight and when time is over, place it on a bowl lightly coated with oil and let the dough rest for and hour or until is doubled in size. Time here will depend on the temperature and humidity of your kitchen. If in one hour or so, the dough hasn’t rise enough, the place might be too cold or the yeast might be old.

If the place is too cold, alternatively you can place your dough in a warm oven with warm water inside (just turn on your oven to warm it up a little bit). Turn off the oven before placing your dough inside and let your dough rest until doubled in size.

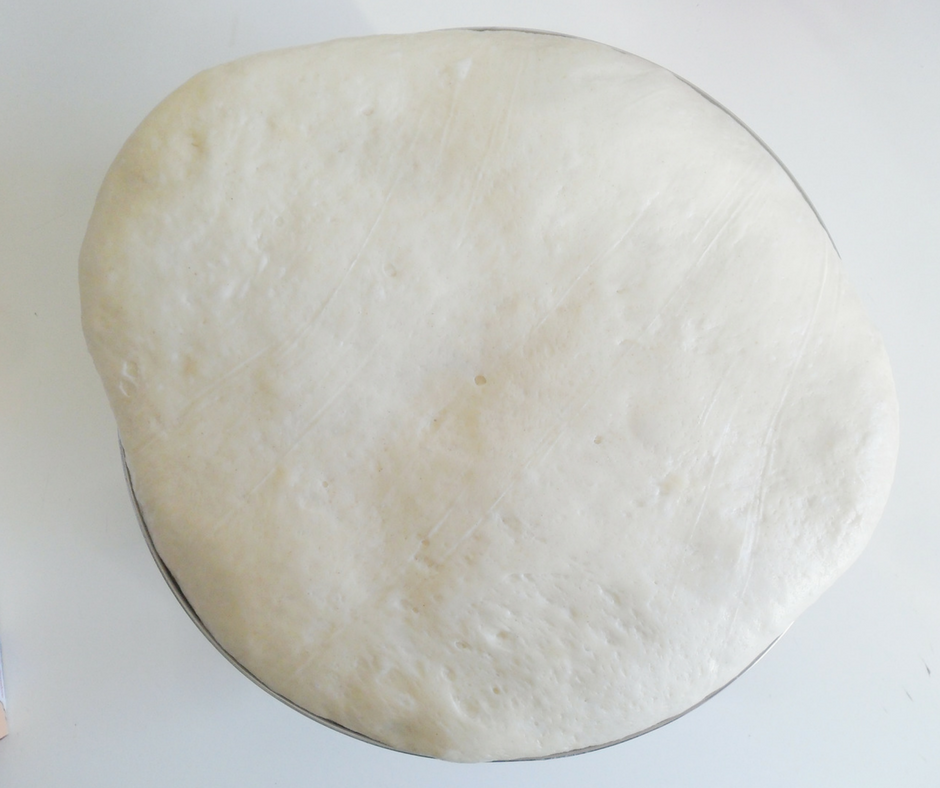
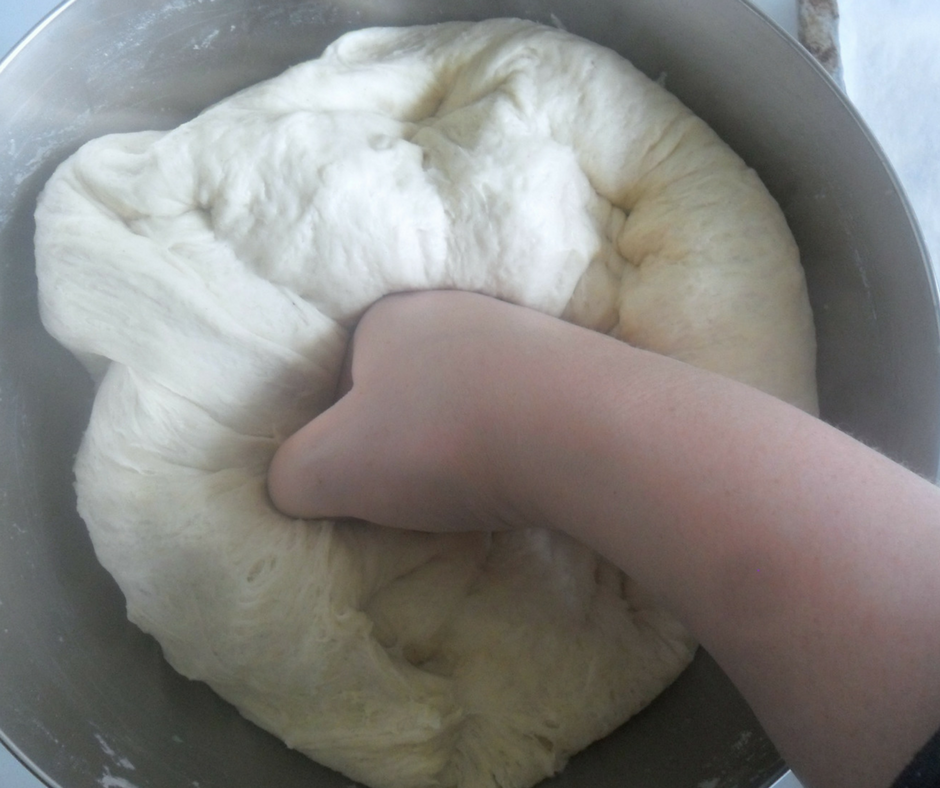
Once the dough has finished its first rise (also called “bulk fermentation”), punch it down and start portioning and shaping the dough.

Portioning & Shaping

The final dough should be 1900 grams or so. I made 6 spiral round challahs, each weighing 110grs. With the remaining dough I made buns/rolls (usually these weigh between 20-30 grams and you’ll get 18 to 20).

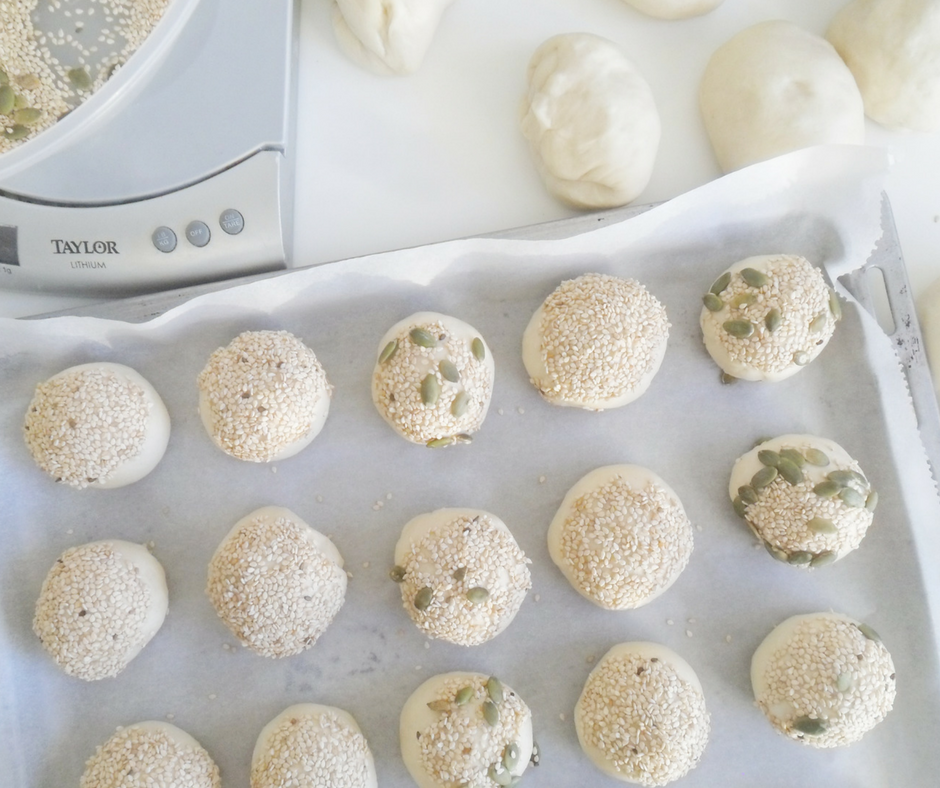
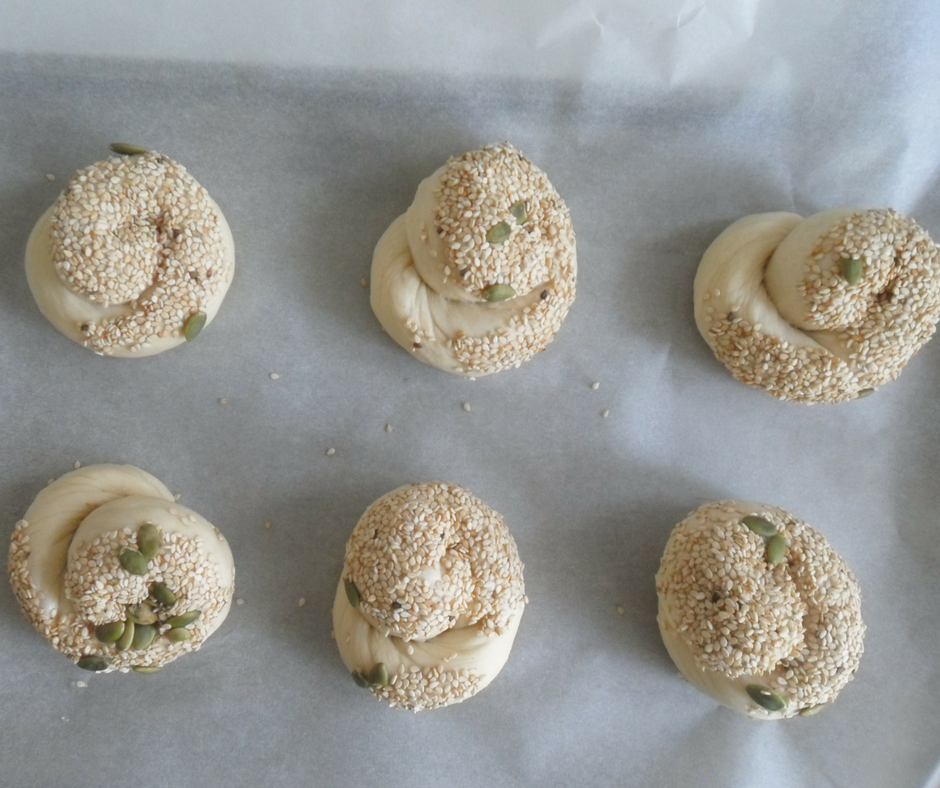
Dip the top of your challah in a bowl of water and inmediately dip in your favorite seed or seeds mixture (for these ones I used pumpkin and sesame seeds). Place your shaped challah or buns in a baking sheet lined with baking paper and let rest for a second time, to achieve the second rise (another hour or so, or until doubled in sized).

15 or 20 minutes before the second fermentation is over, start preheating your oven to 180ºC (350ºF).


Baking

Once your Vegan Challah is ready to be baked, place it in your preheated oven and bake for 30-35 minutes for the spiral round mini challoth or 20-25 the smaller buns. Baking time will vary if your oven lies to you.

Get the bread out of the oven, and transfer immediately to a cooling rack (if you can actually wait for them to cool down, lol, because they are so good straight out of the oven!!)

Ta-Da! You officially made handmade Vegan Challah! 😀 😀 Good job! Tap yourself on the back and enjoy yourself (and your homemade Vegan Challah!) for this accomplishment 🙂

If you have any question regarding this recipe let us know in the comments section below. Also, if you make changes, we want to hear from you! We love experiments!

Also, don’t be shy and show us your challoth and buns on instagram with the hashtag #kasheribbean. If you love this recipe don’t forget to follow on instagram and pinterest and share with your friends and family! It really means a lot to us!

Happy Baking! 😉

Vegan Challah Read More »

These are the Best Yeast Doughnuts. Period! (Dairy-Free)

The Only Yeast Donuts Recipe You'll Ever Need {Dairy-free}

I have been testing yeast doughnuts recipes since 2010. During that time, I have wasted hundreds of pounds of flour (no kidding!) searching for the best, fluffy doughnuts ever eaten, without the load of dairy products. It can take time to find a doughnut you love, and when you do, they will most likely be amazing when fresh, but not so good the next morning… except for these ones!

These doughnuts are a must during Hanukkah, and although they are a labor of love, your family and guests won’t be disappointed, in fact, they might beg for more, because these doughnuts are airy and fluffy even when baked!, and they pass the “next morning” test – reheated in the oven at 300F for about 3-5 minutes, and they were as good as new (hey, you don’t even have to reheat if you leave them at room temperature! In short, these are a dream come true!

And, well, as much as I want to tell you that I did all the”figuring out” by myself, the truth is, a very talented baker that I’ve followed on instagram for some years now, kindly shared her recipe with me, and to that I made adjustments. If you love baking, and want to learn more recipes and tips, you should check her page on instagram.

All the nitty gritty of this doughnut is detailed in the recipe notes below. As I said, these are a labor of love, but so worthy. If after all the details you still have questions, please, don’t hesitate to ask; send me an email or DM on instagram or use the contact form here

These are the Best Yeast Doughnuts. Period! (Dairy-Free)

Course Dessert

Equipment

  • Hand Mixer with dough hook or Stand Mixer

Ingredients
  

  • 1 Kg All Purpose flou
  • 250 gr Bread flour
  • 100 gr White Sugar
  • 20 gr Rapid Rise Yeast* (also called "instant") see Notes below
  • 210 ml Eggs
  • 515 ml Lukewarm Water
  • 100 ml Vegetable Oil (or other neutral oil)
  • 30 ml 30 ml Vanilla extract, butter emulsion or other preferred flavoring
  • 3 gr 3 gr Vanilla Sugar* omit if using vanilla extract
  • 2 gr Salt

Speculoos Donuts

  • 720 gr Speculoos cookie spread
  • 200 gr Speculoos cookies

Chocolate Filling

  • 200 gr Semi-Sweet Chocolate chunks
  • 250 gr Plant-based milk
  • 50 ml Vegan Whipping cream

Glazed Chocolate Donuts

  • 150 gr Confectioner's sugar
  • 30 gr Cocoa Powder
  • 30 ml Prepared instant coffee (or you can use plant-based milk or water instead)
  • 1 tsp Vanilla extract

Instructions
 

  • Cut out squares of baking paper and set aside.
  • In the bowl of your stand mixer, mix the dry ingredients.
  • Add wet ingredients to the mixer and start mixing on low, then medium speed10-12 minutes. (If using hand mixer with hook attachment, make sure you stop the mixer for a minute after a few minutes, to avoid overheating).
  • Transfer the dough to a lightly floured surface. Weight portions of 60 gr for traditional size donuts or 30 gr for 2-bites size donuts.
  • Place the donut over a baking sheet, each donut over a piece of a square of baking paper. Cover the donuts with a towel and set aside.
  • Let the donuts rise at room temperature for about 1 hour, or until doubled in size.
  • About 20 minutes before frying, start preheating your vegetable oil.
  • Place the donuts with baking paper in the hot oil and fry for 2-3 minutes on each side. Once golden brown, remove from the oil and place over a wire rack to drain excess oil.

For the Sugar Donuts

  • Place the donuts in a bowl of sugar while they are still warm.
  • Carefully remove the excess sugar before serving.

For Cookie Butter / Speculoos Donuts

  • Place soften cookie butter in a piping bag with a round tip
  • Make a incision on one side of the donut with a pairing knife, then place the piping tip inside the incision and fill the donut
  • Spread or pipe some cookie butter on top of each donut, and top with pieces of Speculoos cookies.

Chocolate Filling

  • Simmer the milk of choice, and pour the hot milk over the chopped semi-sweet chocolate. Set aside for a few minutes, until the chocolate starts to melt.
  • Mix the milk and chocolate very well with a whisk, until everything is well incorporated, the ganache is glossy and no chocolate chunk remains.
  • Cover the ganache with plastic wrap on contact and set aside until the ganache is semi-firm and spoonable.
  • Mix the ganache with the whipping cream. Place the whipped ganache inside a piping bag with a round tip. Set aside.
  • Make a incision on one side of the donut with a pairing knife, then place the piping tip inside the incision and fill the donut with the whipped ganache.
  • Glaze (recipe follows) and set aside for a few minutes, for the glaze to set.

Chocolate Glaze

  • Mix together sugar and cocoa powder with a whisk to break any lumps.
  • Slowly pour in the coffee or milk of choice, to make a paste.
  • Continue mixing, adding coffee or milk, a little at a time if necessary, until you have a pourable consistency.

Notes

On the ingredients:
THE YEAST:
If you are using "dry yeast" instead of "rapid rise or instant yeast", use double the amount of yeast. 
Instant yeast can be added directly to the dry ingredients, but if you are using dry yeast, you need to bloom (activate) it first. Sprinkle the yeast over the lukewarm water listed on the recipe, mix well with a fork and set aside for a few minutes until foamy. Then, the yeast if ready to use. 
VANILLA SUGAR:
If you don’t have vanilla sugar you can make your own just scrape out the seeds of one vanilla pod and mix with 1 cup of sugar. Place this into a airtight container together with the vanilla pod until ready to use. If you can’t find vanilla sugar or make your own, use 1 tsp of vanilla extract in its place.

If you are making the dough by hand
In a big bowl, mix your dry ingredients, then make a well in the center and add your mixed wet ingredients. Start working with your hands, mixing the ingredients from the center outwards, until you form a dough. It will be sticky. DON'T be tempted to add more flour to the dough itself. Cover the bowl with plastic wrap and let it rest for about an hour at room temperature, until double in size.
** If you will be making the donuts later, you can place the bowl, covered in plastic wrap in the refrigerator, for a slow fermentation, until ready to use. When ready to use, take the bowl out of the refrigerator and let come to room temperature and double in size before proceeding with next steps. 
Once the dough has doubled in size, push down the dough and transfer to a lightly floured surface, and continue with the next steps. 

If you are baking the doughnuts

Preheat your oven to 180ºC (350ºF) .
Shape the doughnuts and place on a baking sheet with baking paper.
Set the donuts aside until double in size, and bake in a preheated oven for 25-30 minutes.
Storing for future use: 
Shape the doughnuts and place over a baking sheet covered with baking paper or a silicon mat.
Place the baking sheet in the freezer until the donuts are rock hard.
Remove the donuts from the baking sheet and store on in a ziplock bag.
When ready to use, place each donut over a square of baking paper and on a baking sheet to come to room temperature and double in size. Then, fry or bake as stated previously 
Keyword dairy-free, donuts, hanukkah

Have you make these Dairy-Free Yeast Doughnuts yet? Use the tag #kasheribbean to share your pictures on social media and, don’t forget to follow on instagram and pinterest for more recipes and inspiration! Until next time.

These are the Best Yeast Doughnuts. Period! (Dairy-Free) Read More »

Sufganyoth Feast: Sweet & Savory Doughnuts Recipes to Light Up your Hanukkah Celebration

Hanukkah is around the corner and one of the signature preparations for Hanukkah is sufganyah, or filled donut. The popular version of sufganyoth are filled with jelly but, of course, you can light up your Hanukkah celebration with these bold and super yummy sweet & savory doughnuts recipes from the blogosphere! (Who says you cannot eat savory donuts for Hanukkah, btw?!)

Yummy sweet & savory doughnuts

1. Lamb Mushrooms Suganyoth with Pistachio Tahini

2. Chopped Liver Mousse and Manischewitz Glaze

3. Swiss Chard and Raisins (Dairy)

4. Goat Cheese, Honey and Thyme (Recipe in hebrew) (Dairy)

5. Herbs & Cheese (Dairy)

6. Biscoff (Cookie Buter) (Dairy)

Disclosure: Please note this post contains affiliate links, which means at no additional cost to you, we earn a few bucks if you decide to make a purchase through any of those links. We only recommend products that we personally use, support and/or would recommend without an affiliate link. Do not spend any money on these products unless you totally feel you need them for more that one-time use. Thank you so much for your support. For more information visit our Affiliate Disclosures Page.

7. Peanut Butter and Jelly (Dairy)

8. Pistachio Pesto (Vegan)

9. Peanut Butter & Jelly (Vegan)

10. Nutella (Vegan)

11. Boston Cream (Vegan)

12. Stout-Chocolate (Vegan)

Aren’t these sweet & savory doughnuts delicious? We are babbling over here and we are sure you are too ? Tell us, which one is your favorite? Do you have a bold sufganyoth flavor? Let us know in the comment section below and don’t forget to follow on instagram & pinterest for more easy recipes and inspiration!

Until next time!

Sufganyoth Feast: Sweet & Savory Doughnuts Recipes to Light Up your Hanukkah Celebration Read More »

Emergency Biscuits (Super Easy, No Milk, No butter)

Hey, there! Today I want to share with you an easy recipe that I just came up with last week after I went to the supermarket to buy some bread (my son’s favorite) but I didn’t find it (insert disappointment face here) so I told my son, we were going home to make some bread… He was so excited and I was so ready to make some biscuits but then I realized I didn’t have butter! Arrgggg! But I decided to continue with my plans so, I took a bowl, added a cup of flour, a little bit of salt, oil and water. Mixed and dumped into the oven at 220ºC (450ºF aprox) for 10 minutes hoping that this mix would be edible, and this is how the emergency no milk no butter biscuits were born.

For my surprise, they were edible! And moist! And soft on the inside but still with a bit of that dry texture on the outside!. For me, giving the emergency, they were actually pretty decent, but I still needed “to make sure” so, while my son was eating, I couldn’t resist the urge and made another batch. In the upcoming days I made these babies at least every other day, to make sure the results were consistent, and, well; now recipe is here it is for you to enjoy.

This recipe is extremely easy, and you can mix it up in under 2 minutes (wohoo!) and cook in exactly 10 minutes.

QUICK NO MILK, NO BUTTER BISCUITS

Yields: 8 Biscuits
Prep. Time: 2 minutes
Cooking Time: 10 minutes.

Ingredients:

250 gr (1 Cup) Self-Rising Flour*
110 ml (1/3 Cup) Water
70 ml (3 Tbsp.) Vegetable Oil
Pinch of Salt

Preparation:

Start by pre-heating your oven to 220ºC (450ºF aprox).
Add flour and salt into a container and mix well.
Add water and oil. Mix with a fork until the dough come together. Don’t need to overdo it. Stop mixing when all the flour is incorporated.
Tip the dough out onto a lightly floured work surface, flatten out with your hands and cut.
To the pre-heated oven they go for 10 minutes.
Get out of the oven and enjoy.

NOTES:
* If you don’t have Self-Rising Flour you can make it yourself very easily. For each 125gr of flour, add 1 ½ teaspoon Baking Powder + ¼ teaspoon of salt.

Easy right?
We hope you like this recipe and put it to good use not only on an emergency situation like mine! 🙂
If you tried this easy recipe, please let us know in the comments section below or use the hashtag #kasheribbean on instagram.

Have a wonderful rest of the day!
Until next time!


Emergency Biscuits (Super Easy, No Milk, No butter) Read More »