December 2018

Caramelized Onions & Arugula Rolls

Caramelized Onion & Arugula Rolls {Dairy-Free}

Recipes happen as any other event in life, some are even the result of unexpected situations, like these Caramelized Onion Paste & Arugula Rolls, that have quickly become a favorite. Bare with me as we explore this incredibly delicious combo in form of dinner rolls.

For weeks I have been thinking about making cinnamon rolls as a gift for a lovely couple. I bought all of my ingredients and when I was ready to make them, I just changed my mind. Why make it sweet when savory rolls can be as delicious? As usual, I opened the fridge and quickly scanned what I had. Onion and arugula seemed like the perfect savory combo at the time, even when I haven’t tried it before, but I went with it and this is the results!

For weeks I have been thinking about making cinnamon rolls as a gift for a lovely couple. I bought all of my ingredients and when I was ready to make them, I just changed my mind. Why make it sweet when savory rolls can be as delicious? As usual, I opened the fridge and quickly scanned what I had. Onion and arugula seemed like the perfect savory combo at the time, even when I haven’t tried it before, but I went with it and this is the results!

Make the Dough

To make these delicious Caramelized Onions & Arugula Rolls you’ll start by making a brioche-style dough, since it has a bit of resting time. While the yeast is working its magic, you can go ahead and make the caramelized onions paste.

If you love this recipe, you may be interested in Coconut Milk Brioche with Chocolate Chunks & Vegan Challah

Make the Caramelized Onion paste

Traditionally, caramelized onions require a lot of time to cook, plus fat and sugar, but for this recipe I followed Cook’s Illustrated method which calls for no sugar and a secret-not-so-secret ingredient and got 225 gr onion paste. Here’s how to make it:

{CARAMELIZED ONIONS PASTE}

3 pounds yellow onions, julienne
3/4 cups water
2 Tbsps Oil 
3/4 tsp salt 
1 Tbsp water + 1/8 tsp baking soda. 

PREPARATION:

1) Cook the onions with water, oil and salt over high heat until the water is evaporated and onions sizzle.

2) Cook on medium-high while pressing & stirring the onions consistently for about 15-20 minutes or until the onions are well browned and sticky.

3) Combine a tablespoon of water with baking soda, add the solution to the onions and cook for another minute until the solution has completely evaporated.

4) Let the caramelized onions cool down and process to a fine paste with a food processor or blender. 
Caramelized Onions & Arugula Rolls

Delicious dinner rolls with caramelized onions paste and arugula
Course Appetizer, Dinner, Snack
Cuisine Mediterranean

Ingredients
  

  • 400 g All Purpose flour
  • 100 g Bread flour
  • 14 g Dry yeast
  • 250 ml Lukewarm milk I used evaporated soy milk. You can use coconut to keep soy-free
  • 60 g Sugar
  • 12 g Salt
  • 90 g Egg yolks
  • 150 g Vegetable shortening You can use butter if not dairy-free
  • 225 g caramelized onions paste

Instructions
 

  • Mix dry and make a well on the center.
  • Add liquids, eggs and 2/3 of the fat. Mix until a rough dough forms.
  • Transfer to a lightly floured surface and knead for 10-15 minutes, until you get a soft dough.
  • Transfer to a lightly oiled bowl and let rest for 1hr at room temperature or until double in size.
  • Knead the remaining shortening in, and let rise for another hour.
  • Punch the dough and form a ball. Let rest in the counter for 10 min to relax. Roll into a rectangular shape, about 17 x 15 inches.
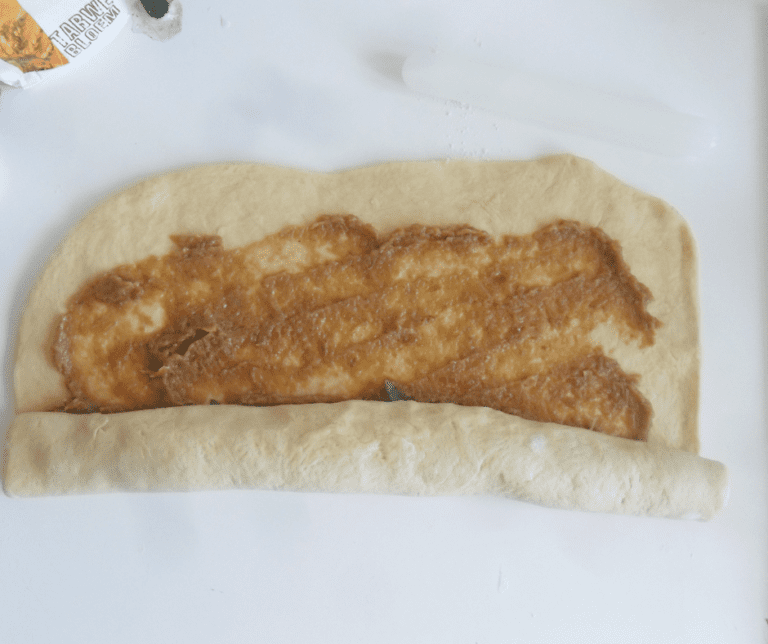
  • Spread the caramelized onions paste evenly and add the arugula. Shape into a roll and cut into 10 rolls.
  • Arrange on a baking sheet with baking paper and bake in a preheated oven at 350°F for 20 -25 minutes, or until the rolls are lightly golden on top.
  • If desired, brush the top lightly with olive oil as soon as they get out of the oven. Let rest on the baking sheet for a few minutes before transferring to a cooling rack to cool completely (if you can really wait for that!!)

Keyword baking, dinner, rolls

 Did you try this recipe?
Share your photos with us on social media and tag us —
Use the hashtag #kasheribbean. We want to feature you!
And don’t forget to follow along on instagram and pinterest for more tips, recipes and inspiration.

WhatsApp
Facebook
Pinterest
Telegram
Email
Print

Caramelized Onions & Arugula Rolls Read More »

Review: Champion Household 4000 Masticating Juicer. For US$325, Is it Worthy?

Review: Champion Household 4000 Masticating Juicer. For US$325, Is it Worthy?

Since last year I have been literally taking the juice out of this machine: The Champion 4000 Household Masticating Juicer

According to the Recommended Assembly Manual, with this juicer you’ll be able to juice Greens, fruits, wheatgrass, leafy greens, whip frozen fruit, make nut butters (with dry-roasted nuts), sauces, soup, baby food (of cooked vegetables) and shred carrots, beets, onions and cabbage.

It looks very promising so I gave it a try (I mean, like a LOT of tries) and this has been my experience so far.

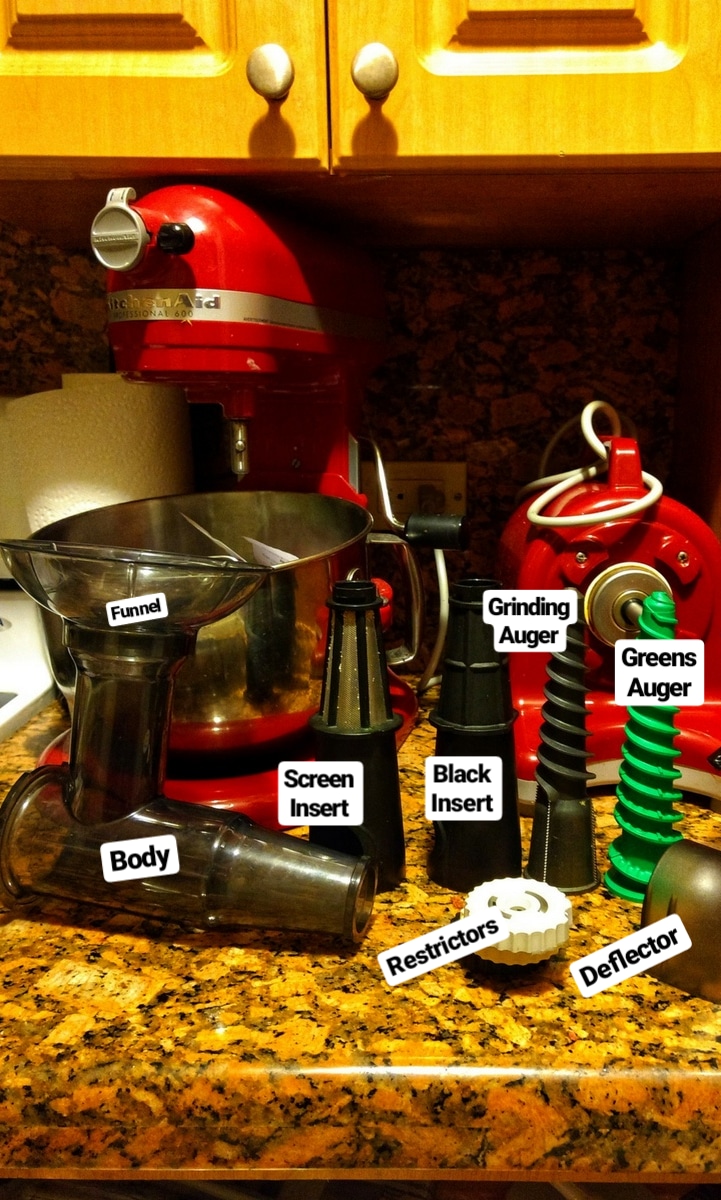
Parts of the Champion 4000

As you can see, this juicer comes with a body tube, 1 screen insert, 1 black insert, 2 augers, 3 restrictors,a deflector and a tamper that I let out of the picture unintentionally while editing.

How to assemble and the parts needed to juice, grind or grate different veggies are included in the manual. The manual also includes a few recipes, but I didn’t tried any.

Making 1-Ingredient Sorbet (oh, yum!)

Frozen fruit is probably my favorite use of the Champion 4000 Household Juicer. I have tried 1-ingredient sorbet with bananas, berries and mangoes (super creamy! the best!) and it was incredibly easy for the frozen fruit to pass through.

To make these sorbets you just have to freeze the separated pieces of fruit in a tray, and once they are frozen, pass them through the juicer with the appropriate attachment. Pure fruit. Best sorbet ever! And a winner with the kids! (As you can see I had to make a lot!)

Making Tahini and Hummus

According to the instructions, you can make nut butters with the Champion Juicer. It specifies you use dry-roasted nuts, but because I didn’t have roasted nuts at home, I decided to give a try with dry-roasted sesame seeds; because technically, tahini is also like a nut-free “butter”, right? no? maybe? lol I am crazy! I know!

I did it anyways and let me tell you, it didn’t work!! lol (but at least I got sesame meal, very nutritious) Totally not the manufacturer’s fault. So, that doesn’t count, but I wanted to tell you anyway in case you have the same “big idea” and then start blaming the juicer. It doesn’t claim to make tahini, so at the end I finished the tahini with a blender, as usual.
 

The hummus on the other hand, came out really good. Exactly how I like it. Creamy but with a few pieces of garbanzos. I didn’t mind because I like it this way but if you prefer a smooth hummus you may use very soft (a bit overcooked chickpeas)

Griding Root Veggies to make Pasteles en Hoja Dominicanos (no, they are not like tamales!)

The most intense of all uses. It was time to make pasteles en hoja and my mother-in-law needed to grind huge amounts of plantains, green bananas, yucca, yautia and ñame (not sure how to call ñame in english because in the dictionary says is “yam” but yam doesn’t look at all like the root veggie I am referring to, big ops!) so this was going to be the real test!

This Juicer is so powerful, it can grind root veggies so easily. I was done in no time. If you would spend like 3hrs grating all veggies the old fashion way, you can literally finish all within 10 minutes. Super cool.

This is just one of our “grinding sessions” (we had at 4). Just as a side note, when I am grinding that amount of veggies I like to turn off the juicer for a few minutes to prevent overheating, just in case.

And this is one Pastel en Hoja stuffed with chicken, veggies and garbanzos (dominican-style) in case you are wondering…

Grating Potatoes and Other Vegetables

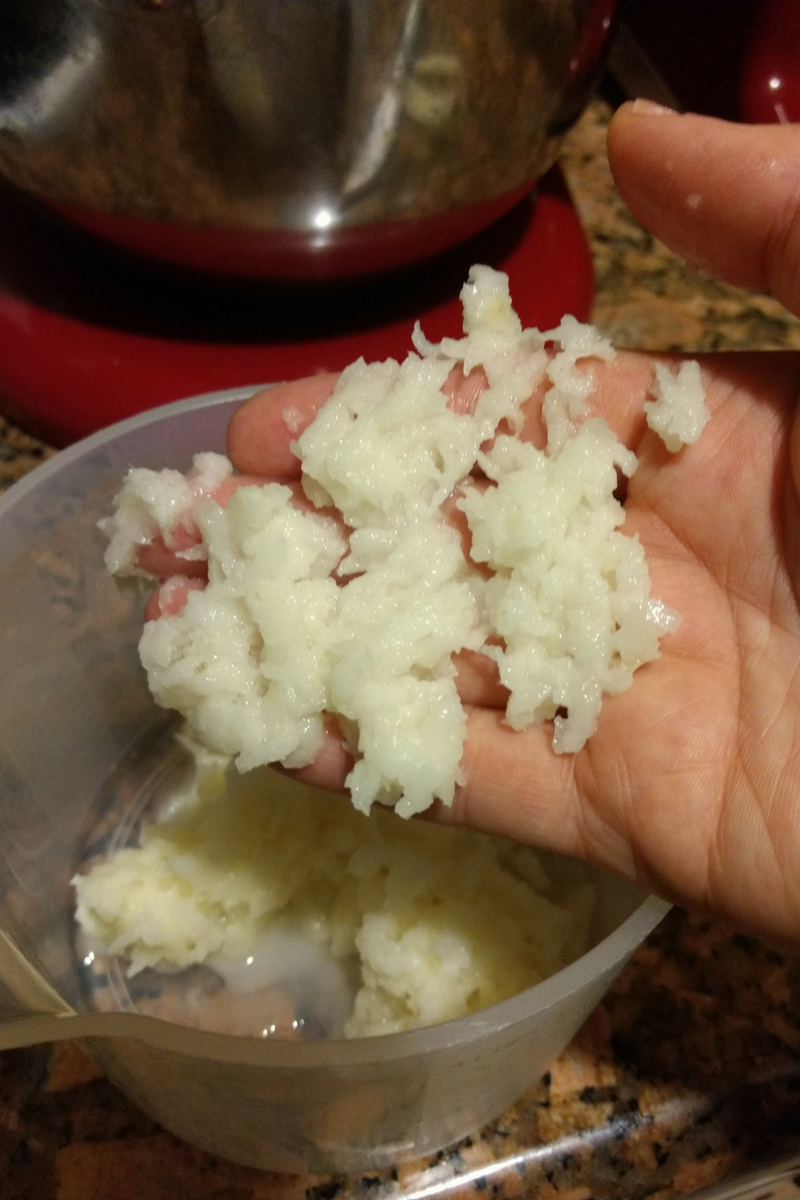
The Champion Juicer works really great for grating veggies (specially potatoes, beets, carrots, cabbage), but of course, I will just use it for grating big amount of these veggies.

In short…

PROS:

  • Versatile: Can juice fruits, greens, wheatgrass, shred veggies, make sauces, soups, baby food, nut butters (with dry-roasted nuts), and frozen fruit sorbets.

  • Excellent for Frozen Fruit Sorbets: Super creamy, pure fruit desserts that kids love. Very easy to use.

  • Great for Hummus: Produces creamy hummus (slightly chunky if chickpeas aren’t overcooked).

  • Powerful Grinder: Handles tough root vegetables (plantains, yuca, yautía, ñame) with ease—saves hours compared to manual grating.

  • Efficient for Large Quantities: Cuts down prep time drastically (e.g., 3 hours of grating reduced to 10 minutes).

  • Good for Grating Vegetables: Works especially well with potatoes, beets, carrots, and cabbage.

⚠️CONS: 

  • Not Suitable for Tahini: Attempt with sesame seeds didn’t work (produced sesame meal instead).

  • Requires Resting for Heavy Use: May need to pause during long grinding sessions to avoid overheating.

  • Not a Smooth Finish for Hummus (unless using very soft chickpeas).

  • Bulky Setup: Multiple parts and attachments required, which might feel like extra work for smaller tasks.

Final Thoughts

The Champion 4000 Household Masticating Juicer is a powerful, versatile machine that shines with frozen fruit sorbets, hummus, and especially grinding/grating large amounts of vegetables or root crops—making it perfect for batch cooking or traditional dishes like pasteles en hoja. While it doesn’t handle tahini or nut butters outside of the manufacturer’s guidelines, and may require occasional rest during heavy use, it’s an excellent investment for serious home cooks who process big quantities of fruits and vegetables.

WhatsApp
Facebook
Pinterest
Telegram
Email
Print

Review: Champion Household 4000 Masticating Juicer. For US$325, Is it Worthy? Read More »

Rice Pudding: 3 Ways {Traditional, Coconut & Coffee}

Rice Pudding is one of those simple dishes you could eat over and over again. For breakfast, for dinner or for dessert, hot or cold, plain or dressed up, is one of a kind recipe. Easy to make and so versatile. Get ready to learn how you can make delicious Rice Pudding 3 ways: the traditional dairy version, the vegan coconut version and the coffee version {can be made dairy or vegan and is delicious!}

The Basics of Rice Pudding

Rice Pudding is one of the most basics and popular breakfasts, dinner and/or dessert served in Dominican Republic.

Is incredibly easy to make, and as you can see, super versatile. The most basic version need 5 ingredients: rice, milk, sugar, salt and lemon peel. For extra flavor some people also add cinnamon stick and sweet cloves, but let’s keep it simple this time. You can later experiment adding more flavor.

When making Rice Pudding I personally prefer to start with my rice uncooked, but you can certainly use leftover white rice, that is not too salty or greasy, and still have a delicious rice pudding.

Are you looking for more recipes with rice? Check out our Dominican Style Spicy Sardines Rice & Beer and Almonds Risotto

The Traditional Version

In general terms, the traditional version of Rice Pudding is made with Milk. Whole milk is just fine for the recipe, but if you are looking for the best of the best, thick and super creamy Rice pudding, always use evaporated milk.

Nowadays you can easily find evaporated plant based milks; you can certainly use that if you avoid dairy products.

The Coconut Version

To make the coconut version you just need to use full fat coconut milk instead of whole or plant-based milk of choice.

What I like about the coconut version is that it has such a silky texture and is very light compared with the dairy version. It also has a very delicate aroma, and a pure white color at the end, which I love. It just looks heavenly.

Keep in mind that in all recipes on the blog that call for Coconut milk we use FULL FAT, simply because we want all that coconut milk goodness in our final product. Fat free or low fat coconut milk are usually full of flavorings, including sugar, and use gums to give a thick texture, but the flavor in general is always off. Avoid yourself the headache of ruining a delicious silky smooth rice pudding by buying the best full fat coconut milk you can find on the market, with not extras or nasty ingredients.

The Coffee Version

Almost a month ago I published a photo on instagram of my breakfast that day: a small glass container full of Coffee Rice Pudding.

The idea just came to me when I couldn’t decide if I wanted a full delicious cup of coffee, or a bowl with freshly made thick and totally delicious rice pudding. Both fill up my stomach easily on their own, and because I couldn’t have both (obvious reason: I am trying to lose my next 25 pounds) I ended up adding a bit of instant coffee to the rice pudding while it was still hot.

Taste wise, the result was a-ma-zing! and to my surprise, that “out-of-the-blue-picture” quickly had over a hundred likes, so is a fact; instagram is full of #coffeelovers.  😛

How to Make Rice Pudding

Have you make this recipe or any other from the blog? Use the tag #kasheribbean to share on social media and, don’t forget to follow on instagram and pinterest to keep up with our easy recipes from us and the blogosphere!

So, now there is a gazillion possibilities on how you can take your traditional rice pudding to the next level. What special ingredient will you add to your very own version?

Until next time! ?

Rice Pudding: 3 Ways {Traditional, Coconut & Coffee} Read More »